Monday, October 29, 2012

Cottage Cheese Cantaloupe Salad

Don't let the name turn you away. It might not sound appetizing, but looks can be deceiving.This recipe was everything you could want in a perfect snack or appetizer: nutritious, cheap, easy, and yummy!

I have never been a fan of cottage cheese, mainly because I was too freaked out to try it. I grew up seeing my mom eat it by the spoonful and something about the look of it/ name of it/ texture really turned me off. As I matured into the grown up woman I am today (HA), I entertained the idea of trying cottage cheese and slowly grew to like it. I love to eat it with potato chips, mix it with a little jelly, or add fruit and make it sweet. 

The idea of fruit was what led me to this wonderful snack. Low-fat cottage cheese enhances the natural sweetness of cantaloupe and makes for a tasty treat yet still nutritious snack or appetizer.

I scooped out the middle of a half cantaloupe and put the cottage cheese inside, but you can always cut the cantaloupe into tiny pieces and mix it all together in a bowl. I figured my way looked a little more presentable if you wanted to put it out for guest. 

I added raisins and sliced almonds, but feel free to vary what's added. Granola 
would also be a very good choice.


(I varied a lot from the original website, but here is where the idea came from)

http://www.rd.com/food/cottage-cheese-cantaloupe-salad-recipe/


INGREDIENTS 


  • 2 cups (16 ounces) 1% cottage cheese
  • 1/2 cup raisins
  • 1/4 cup sliced almonds 
  • 1 medium cantaloupe, quartered and seeded
  • DIRECTIONS
  • In a bowl, combine the cottage cheese, raisins, and 
  • walnuts; mix well
  • Spoon into hollowed out cantaloupe. Enjoy! 


Thursday, October 25, 2012

Garlic Lemon Chicken

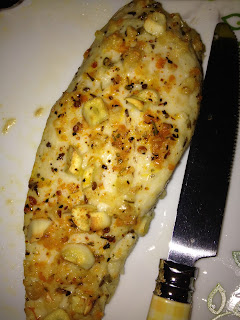
When it comes to time management and cooking chicken, I seem to be on a roll. Here is another recipe that took very little time to make, has few ingredients, and tastes like it was ordered at a fine dining restaurant. I seem to have a thing for garlic these days. I don't mean to, but I'm always drawn towards the recipes that call for his flavorful ingredient. 

Tonight I was home alone and working on a paper when my always frequent procrastination set in. I needed to take a break (10 minutes into the paper) and had the urge to cook. I'm telling you, I'm a new person. I'm going to be housewife of the year someday (completely kidding). 

I was shocked to have had all of these ingredients on hand and knew it was a sign that this chicken was made me for me to cook. I've been eating healthy all week and ok, I know frying chicken isn't the most nutritious way to cook it, but I needed a little diversion in my life. Hey, much better than fast food at least. It took me all of fifteen minutes to make and allowed me to get right back to staring at my computer screen…I mean writing my paper.

If you prefer not to fry the chicken, you can bake it on 375 for 30 to 40 minutes. Just make sure you marinade the chicken, instead of just pouring the ingredients on top so it can absorb the flavor. 


              (I scraped some of the bread crumbs off- it was a little much) 

4 boneless skinless chicken breast halves--> I only had 2 and it was just enough! 
4 teaspoons flour
salt and pepper
2 teaspoons oil
1/2 cup chicken broth
1 teaspoon minced garlic
2 teaspoons lemon juice
1 teaspoon butter--> I used margarine


Flatten chicken slightly. Dust with flour. Salt and pepper chicken.

Fry in hot oil 5 minutes each side. Remove chicken from pan.

To pan add broth, garlic, lemon juice and butter. Cook 2 minutes. Pour over chicken.

http://www.food.com/recipe/15-minute-garlic-lemon-chicken-20624


Monday, October 22, 2012

Cooking Basics

I came across these two cheat sheets one day in class. Aimlessly scrolling through Pinterest, I knew I spotted this measuring equivalent chart and veggie cooking cheat sheet and knew I would think myself later for re-pinning them. Just thought i'd share! I printed them both out and stuck them in a kitchen drawer. I cannot tell you how many time's i've used them, especially the equivalent sheet- because clearly, I have forgotten basic measuring, taught in fourth grade….


http://www.kidspot.com.au/meal-planning/Tools-Veggie-cooking-guide+6774+753+article.htm#.T063Jwtusb0.pinterest

http://pinterest.com/pin/94294185918710611/


Saturday, October 20, 2012

Oven-Roasted Eggplant

I never realized how unique certain foods are. Eggplant being one of them. The color is absolutely beautiful, the skin on the outside perfectly shiny and smooth. I guess I was feeling a little artistic today but I was really intrigued by this vegetable. I myself would never buy an eggplant. The thought would never even cross my mind when grocery shopping. But I was home for the weekend and my mom happened to have one in the fridge. I had never cooked eggplant before, have only tried it maybe once. It was an anomaly to me. How exactly could you cook this beautiful, purple, object and would it actually taste good? I took a shot at it. 

Since I've never cooked eggplant before, I chose a very simple recipe. I wanted conquer the basics rather than risk trying something too complicated and messing it up. I chose a basic oven-roasted recipe that seemed simple to make.

The most confusing part of the experience was the eggplant itself. The texture of the inside was just as surprising to me as the outside. I followed the recipe, cutting diamond like slivers in the skin and sprinkling salt into the cuts. After baking the eggplant, I was surprised to see how it looked when cooked. It shriveled up into a considerably smaller shape and the outside skin turned a funny brown color. 

I was a little unsure of what I was about to put in my mouth when I finally tried it. It was interesting to say the least. I had to get familiar with the taste but ended up liking it. I won't say that it is my favorite vegetable, but I would be willing to try different variations of the recipe sometime in the future. 


2 lb. eggplant (about 2 globe or 4 Italian) 
Kosher salt 
2 to 3 Tbs. extra-virgin olive oil 
8 fresh thyme sprigs ---> I didn't have these (therefore didn't use them)
Lemon wedges or a vinaigrette for serving (optional) 


Wipe the eggplant clean and slice them in half lengthwise. With the tip of a knife, score the flesh deeply in a diamond cross-hatch pattern by making two or three long cuts, cutting at a steep angle, and then rotating the eggplant to make another set of similar cuts. Press on the edges of the halves to open the cuts and sprinkle salt (1 to 1-1/2 tsp. total for all the halves) over the surface and into the cuts. Set aside, cut side up, for 30 min. Heat the oven to 400°F. Line a baking sheet with parchment.
Over the sink, gently squeeze the eggplant to extract the salty juice and wipe them dry with a paper towel. Brush each half thoroughly with olive oil (about 1 tsp. per half for Italian eggplant, 2 tsp. per half for globe). Arrange each half, cut side down, on top of a sprig or two of thyme on the baking sheet. Roast for 1 hour. Let cool considerably before handling, at least 20 min. Gently turn the cut side up. If serving as a side dish, serve with a lemon wedge for squeezing or drizzle with vinaigrette. 

http://www.finecooking.com/recipes/oven_roasted_eggplant.aspx?nterms=52350,53084

Thursday, October 18, 2012

Baked Egg Cup

As I mentioned in the beginning, my diet use to consist largely of fast food. When it came to breakfast, McDonald's was my first choice (crazy not Chick-fil-a huh?). I would always get an Egg McMuffin- cheap, relatively healthy, and quite tasty. Recently, I learned how to easily re-create the Egg McMuffin at home, saving a good bit of money and wasted time driving to McDonalds. Long story short, eating all of these Egg McMuffins (first McDonalds, then my own) has burned me out. I wanted to try something a little different and was excited when I discovered this recipe. 

It is basically the Egg McMuffin sans the mcmuffin. Seems I just can't stay away from them. I chose to whisk the egg in a small bowl before putting it in the muffin tin, but you don't have to. If you don't do it then the yolk will taste the way it does when you boil an egg (if that makes sense). You're choice! You can also use turkey instead of ham. I only had turkey at my house and it worked just fine. The cheese can also be varied. I used cheddar but I think it would also be good with mozzarella, pepper jack, maybe even feta? It's the perfect breakfast to make when you don't have much time to spend cooking. All you have to do it drop the few ingredients in the muffin tin and viola! You have a hot, protein packed breakfast. 

Also good to remember when you have to feed a-bunch of people but still want to look like you put in effort... :)


Ingredients

12 Eggs

12 thin slices of deli ham (round)
1/2 Cup of your favorite cheese (I used Parmesan)
1/2 Cup diced scallions
Directions 
Fresh cracked Sea Salt and Pepper
Preheat the oven to 400.  Spray a muffin tin with cooking spray.  
Lay a piece of ham in each hole creating a little ham cup.  
Crack one egg into each hole and sprinkle with salt and pepper.
Bake the eggs for about 12 minutes…until the white is firm and the yolk is still nice and runny.

Carefully remove each egg from the muffin tin and top with grated cheese and scallions.  Serve hot! 

http://thesimpledelights.com/?p=246

Monday, October 15, 2012

Shrimp & Grits


My roommate convinced me to go out to eat last night. I had been doing so well up until this point, not wasting money on food I had right in my kitchen. Eating out has become a special occasion to me. Maybe family's in town, or a night out with the girls is planned. Or the once in a blue moon date with a BOY. Crazy huh? It's saved for retrieves from cooking, not from a laziness towards it.

Like I said, we went out to eat at Square One, which is actually a very good restaurant. Since I am the continually poor college student, I stuck with a Caesar salad, but couldn't help but notice the food at the table next to me. The most delicious shrimp and grits I had ever seen sat in front of both people beside me. It took all I had not to reach my fork out and take a taste. Luckily, my self control stayed intact.
I decided at that moment that I would have to try and re-create the dish that kept distracting me all night. 

I have personally never cooked shrimped before. Not even just to eat plain. My mom cooks them all the time but I guess I never really paid much attention. Cleaning the shrimp, or as properly termed "de-veining" the shrimp, was not fun (I was less than thrilled when my mom told me after the fact that you can buy de-veined shrimp). It was time consuming and tedious but now you all know it doesn't have to be like that. You're welcome for being the guinea pig.

The rest of the preparation went smoothly. I forgot the mushrooms but I think it tasted just fine without them. I should also note that I ended up adding about half a cup of water to the shrimp- it needed more liquid and the water did just the trick. 

Now i'm not going lie and try and say this recipe is healthy. It's probably not. If you want healthy, nix the grits, but how terrible would that be?? We can just consider this a cheat day :) 


Ingredients


  • 2 1/3 cup(s) whole milk
  • 2 cup(s) water
  • Salt
  • Pepper
  • 1 cup(s) quick-cooking grits (not instant)
  • 6 slice(s) bacon, chopped 

  • 1 bunch(es) green onions, thinly sliced
  • 2 clove(s) garlic, finely chopped
  • 1 small red pepper, finely chopped
  • 1 pound(s) frozen shelled and deveined raw shrimp, thawed

  • Directions

    1. In 4-quart saucepan, heat 2 cups milk, water, and 1/8 teaspoon salt to simmering on medium-high. Whisk in grits. Cover; reduce heat to medium-low. Cook 10 minutes or until liquid is absorbed and grits are tender, stirring often. Keep warm.
    2. Meanwhile, in 12-inch skillet, cook bacon on medium-high 5 to 7 minutes or until brown and crisp, stirring occasionally. With slotted spoon, transfer bacon to paper-towel-lined plate. Discard all but 2 tablespoons of fat in pan.
    3. To same skillet, add green onions, garlic, and 1/4 teaspoon freshly ground black pepper. Cook 2 minutes, stirring. Add red pepper; cook 2 minutes, stirring often. Stir in shrimp and remaining 1/3 cup milk; cook 5 to 6 minutes or until shrimp just turn opaque, scraping up browned bits. Remove from heat. Stir in bacon and hot sauce.
    4. To serve, spoon grits into shallow bowls; top with shrimp. Garnish with additional green onions and hot sauce, if desired.

    http://www.goodhousekeeping.com/recipefinder/easy-shrimp-grits-recipe-ghk0112 


    Thursday, October 11, 2012

    Baked Garlic Brown Sugar Chicken

    Ready to hear the simplest, most delicious baked chicken recipe out there? Really though, this one is a classic for sure. I've been a little weary cooking with raw meat, mainly because I never cook with raw meat. The only meat I usually eat on my own is either processed turkey or frozen chicken cooked on the George Foreman. I wanted to try something less processed, less frozen, and much more tasty. Feeling pretty poor, I felt as though I had hit the lottery when I came across this recipe. The two ingredients I needed (other than the chicken) I already had! Brown sugar, and garlic. Surely EVERYONE has these two. Believe me...if I do, then you do. All I had to buy was the chicken- $4.50 at Kroger...all in all, very cheap. 

    Al righty now for the cooking part. Maybe it was my lack of experience with cooking chicken, but I will be honest, I was very unsure how this was going to turn out. I felt as though the chicken would surely be too bland with only some brown sugar & garlic sprinkled on top. Thankfully, I was wrong. The sugar & garlic mixture forms a type of sticky glaze over the chicken, covering it in entirety. The flavor reminded me of oriental dishes I've had before. I give it a 10/10. 


    Ingredients

    4 boneless skinless chicken breasts
    4 garlic cloves, minced
    4 tablespoons brown sugar
    Directions
    1. Preheat oven to 500°F and lightly grease a casserole dish.
    2. In small sauté pan, sauté garlic with the oil until tender.
    3. Remove from heat and stir in brown sugar.
    4. Place chicken breasts in a prepared baking dish and cover with the garlic and brown sugar mixture.
    5. Add salt and pepper to taste.
    6. Bake uncovered for 15-30 minutes.

    http://jujugoodnews.com/baked-garlic-brown-sugar-chicken/

    Wednesday, October 10, 2012

    Oven Sweet Potato Fries

    I think my mom is obsessed with sweet potatoes...per my request, she kindly brought me groceries on one of her trips to visit. Milk, eggs, lettuce- the usual. And TEN sweet potatoes. Ten. She claims my grandfather gave her a bunch and she was just trying to get rid of some (why he has that many sweet potato is just as alarming). Anyway, I have been trying to come up with different ways to cook them before they go bad. I've always been a huge fan of sweet potato fries at restaurants, but never have tried to make them myself. This recipe was a complete gamble. I found it on another cooking blog and decided to give it a shot.

    I'm going to be honest, the preparation was quite difficult. I almost lost a few fingers...literally. I'm not sure if there is a trick i'm unaware of but raw sweet potatoes are nearly impossible to slice. My roommate watched me with full intention of having to take me to the ER. It was so difficult, BUT....

    So worth it. They were delicious! Therefore, I'd recommend either figuring out a better way to cut them, or taking your chances and being super careful. They are cheap to make, nutritious, and soooo yummy.

    Enjoy!

                                                   PS: This picture does not do them justice :)
    RECIPE:


    • 1 large sweet potato, peeled, sliced into medium strips
    • 1 tablespoon Extra Virgin Olive Oil
    • 1 egg white slightly beaten
    • 1/2 teaspoon curry powder
    • 1/2 teaspoon black pepper
    • 1/4 teaspoon cayenne pepper (OPTIONAL)


    DIRECTIONS:

    Preheat oven to 425 degrees.
    Combine dry ingredients in a gallon size zip lock bag. Whisk together in a large bowl oil and egg white. Add potatoes and spices to oil & egg mixture, toss lightly to coat.
    Place potatoes on a non-stick cookie sheet, spread out so they are not touching, bake 30 minutes or until tender on the inside and crunch on the outside. Turn potatoes after 15 minutes of cooking time.
    NOTE: Feel free to add more spices or different spices altogether


    http://skinnyms.com/sweet-potato-fries/

    Sunday, October 7, 2012

    Baked Cream Cheese Spaghetti Casserole

    Yesterday I was feeling especially considerate (ok,maybe a little bored), and wanted to surprise my roommates with a homemade dinner. So far, I've focused on cooking for one person. I really wanted to broaden my expertise, maybe show off a little, and find a recipe that would impress my roommates. 

    I don't know what triggered this memory, but I started thinking back to my soccer days in high school. Before every play-off game, we would always meet at my coaches house for dinner. His speciality was an infamous "spaghetti casserole." I figured this would be the perfect dish to make for the roomies, if I could figure out the recipe. 

    I searched around online and found variations of different "spaghetti casseroles," finally picking one. The hardest part was deciding between cream cheese, sour cream, or cream of mushroom soup. All of which can apparently be interchanged for one another. I chose cream cheese and deemed it a success.


    Both of my roommates loved it, it was pretty easy to make, and we had tons of leftovers (lunch tomorrow!). To make it healthier, I used whole wheat spaghetti, reduced fat cream cheese and parmesan cheese, and ground turkey (instead of ground beef). All in all costing me less than $10. 


    RECIPE
    12 oz whole wheat spaghetti 
    1 (28 ounce) jars prepared spaghetti sauce
    1 lb ground turkey
    1 tsp Italian seasoning
    1 clove garlic, minced
    8 ounces reduced fat cream cheese
    1/2 cup reduced fat parmesan cheese, grated


    DIRECTIONS

    Preheat oven to 350 F degrees.

    In a skillet, brown the ground beef until cooked through; drain fat and stir in spaghetti sauce.  Set aside.

    Cook spaghetti according to directions on packet.  Drain and place cooked spaghetti in bowl.  Add cream cheese, Italian Seasoning and minced garlic.  Stir until cream cheese is melted and the spaghetti is thoroughly coated.

    Lightly grease a 9x13" pan.  Spread a small amount of meat sauce in the bottom of the dish.  Put spaghetti on top of sauce and top with remaining meat sauce.  Sprinkle parmesan cheese on top.

    Bake for 30 minutes, until bubbly.


    http://allrecipes.com/recipe/the-best-spaghetti-casserole/