Thursday, November 8, 2012

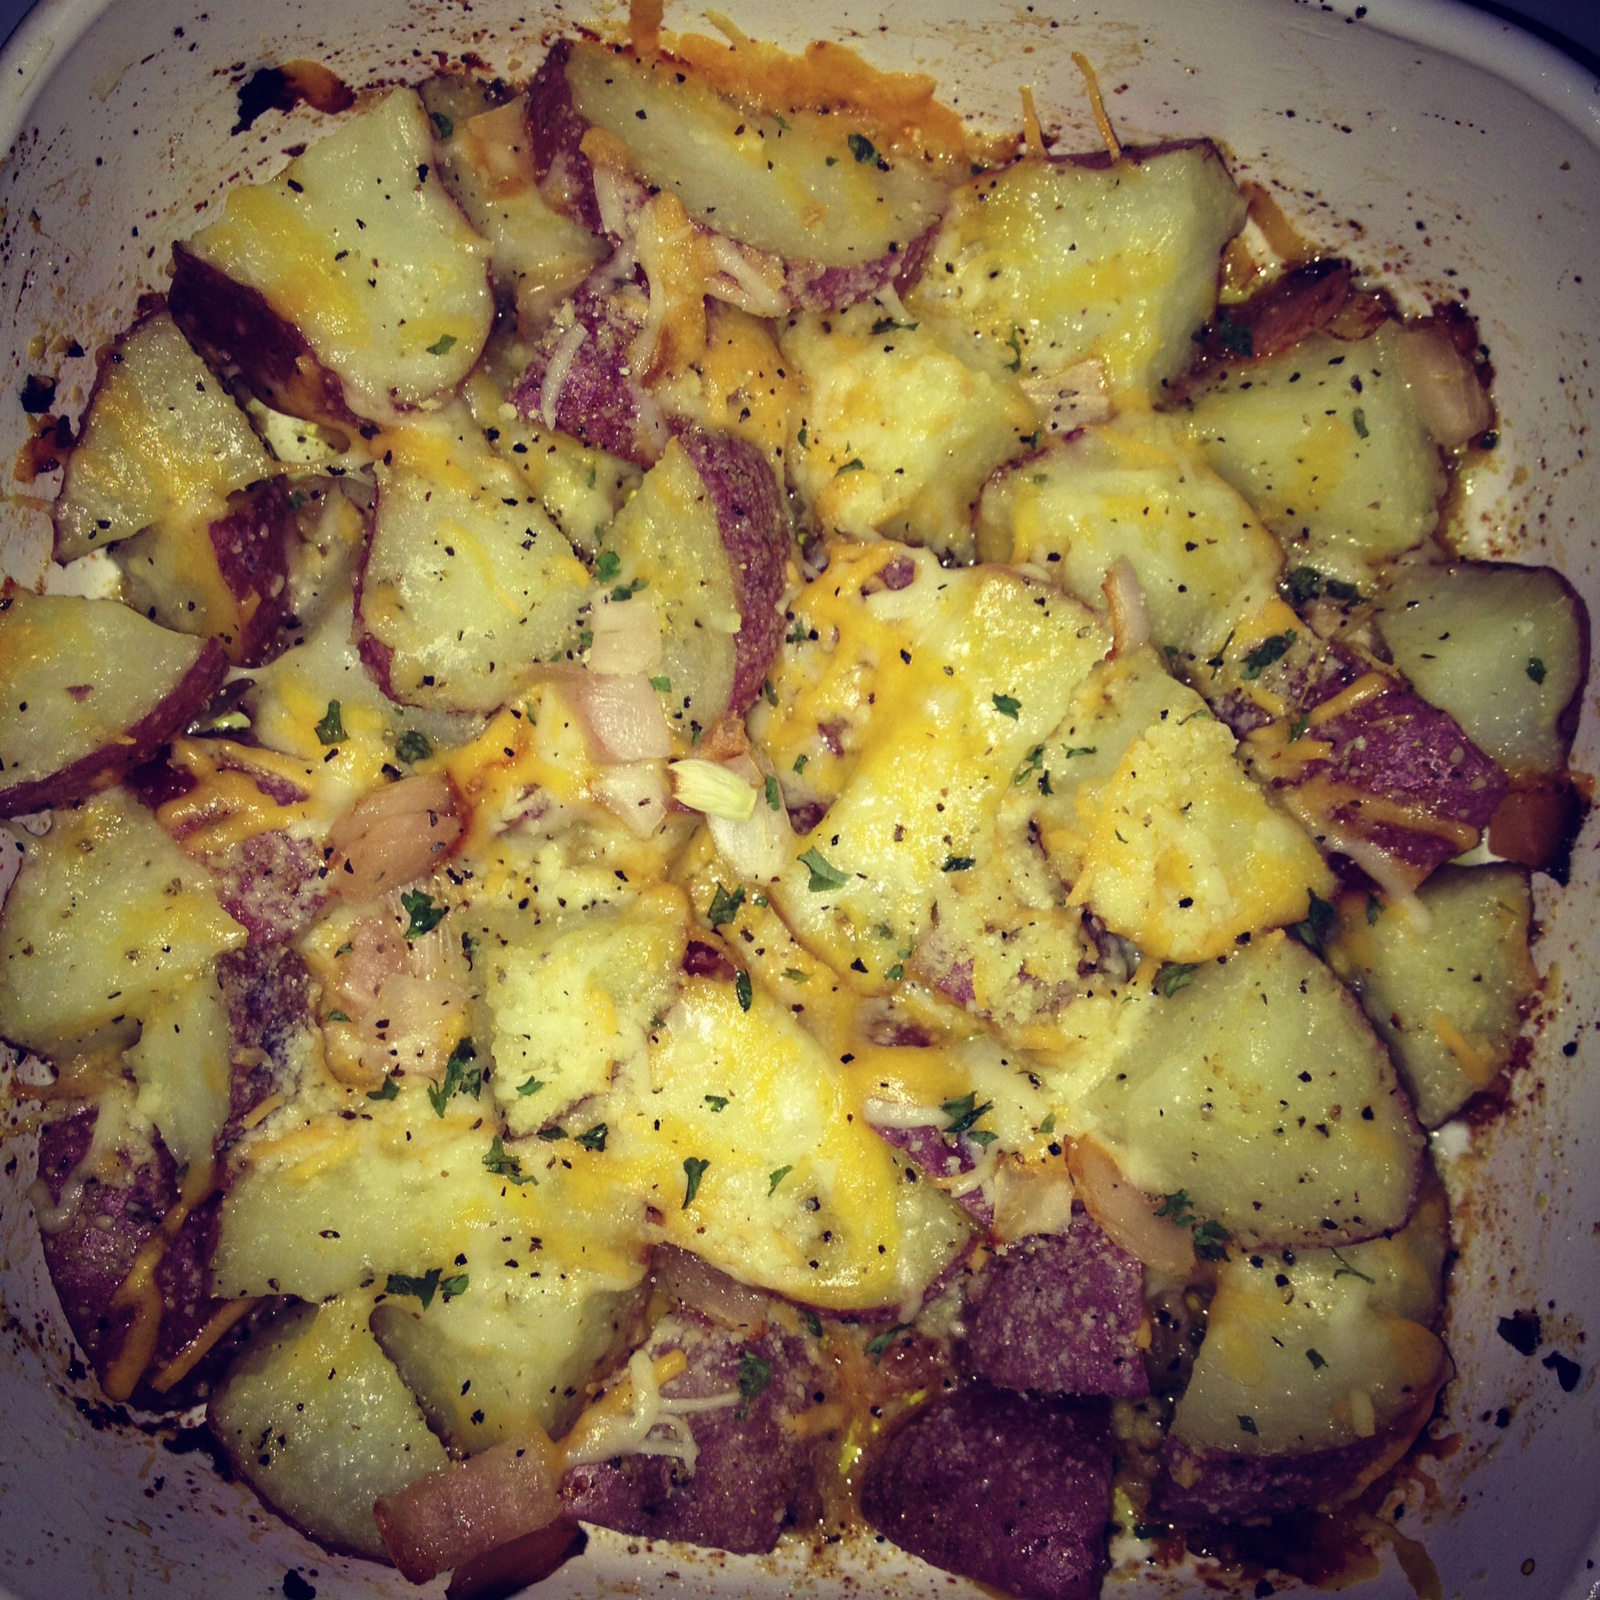
Roasted Red Potatoes w/ Cheese

I wanted to try something new. Nothing challenging or too strenuous, just something new. I stole a bunch of small red potatoes from home a few weeks ago and never got around to cooking them. Red potatoes are my absolute favorite. They are the perfect portion size when not wanting to get too full on starches, and can be cooked many different ways. They're best when they perfectly crisp on the outside (my dad's specialty) and have just the right amount of saltiness. 

I'm not a big eater when it comes to meals. By this I mean I am perfectly content with just one dish, not needing the usual main entree with sides like most normal people. I made these potatoes with the intention of being my dinner and it worked out just right- they hit the spot. For others, this might be used more as a side dish (maybe with some steak??). Either way, I will absolutely make it again. 

PS: don't let the ranch scare you- i'm not a big fan of ranch but it worked well with the recipe


1/2 cup KRAFT Light Ranch Dressing 
    1/2 cup KRAFT 2% Milk Shredded Cheddar Cheese 
    1/4 cup OSCAR MAYER Real Bacon Bits 


      2 lb. small red potatoes (about 6), quartered 
      1 Tbsp. chopped fresh parsley

    HEAT oven to 350°F.

    MIX first 3 ingredients in large bowl. Add potatoes; toss to coat.

    SPOON into 13x9-inch baking dish sprayed with cooking spray; cover.

    BAKE 55 min. or until potatoes are tender, uncovering after 40 min. Sprinkle with parsley. 

    http://www.kraftrecipes.com/recipes/roasted-red-potatoes-bacon-76135.aspx


Sunday, November 4, 2012

Tomato, Basil, & Mozzarella Baked Pasta

It's officially November! That means the holidays are right around the corner. I get a little too excited for this time of year. I love the decorations, music, time with family and friends, and most importantly, FOOD. We had our Thanksgiving meal a little early this year at work. Everyone was leaving town at different times, no one's schedule was compatible with another's, so we decided that Thanksgiving would have to come in early November.

We each volunteered to bring a dish. My boss was in charge of the stables: turkey, gravy, and dressing, and we were to add our own personal flare by bringing in something that we really liked. My mom has made this recipe for years. She loved to make it during the holidays (though you might say it's a little random), and it has always been a tradition for our family, as simple as the recipe may be.

BUT, leave it to me to forget the most important ingredient! The recipe calls for shrimp, and ding ding, I forgot the shrimp (hence why shrimp is not in the title). I must be running around in way too many circles these days because I didn't realize it was missing until after it came out of the oven. Luckily, it tasted just fine. I'm gone a little overboard on shrimp these days anyway…

Everyone loved it, like I knew they would, and I was proud to say I made it myself. Since this was a special occasion, this recipe was also an exception to the guidelines i've been trying to follow. It really was simple to make, but it did call for quite a few ingredients ($$), and probably was not the most nutritious thing i've put in my mouth. But during the holidays, there's not such thing as healthy (at least to me).  Maybe these guidelines should be a little altered …

Good luck!


  • 1 pound small shell pasta
  • 2 tablespoons extra-virgin olive oil, 2 turns of the pan in a slow stream
  • 3 large cloves garlic
  • 1/2 small to medium yellow onion
  • 1 (28-ounce) can crushed Italian tomatoes, any brand
  • 1/2 cup, 10 to 12 fresh basil leaves, torn into small pieces
  • Salt and pepper
  • 1 cup store bought basil pesto sauce
  • 1 cup ricotta cheese
  • 1/2 cup grated Parmigiano-Reggiano, a couple of handfuls
  • 1/2 pound mozzarella

Bring a large pot of water to a boil and salt the water. Add small shell pasta and cook the pasta to al dente doneness which means that the pasta will still have a bite to it or be a little chewy. The pasta will soak up more juice and keep on cooking after we drain it, so we need it to be a little under cooked. The shells will probably cook about 9 or 10 minutes.

Preheat a deep, big skillet or a medium sauce pot over medium heat.
Place garlic on the cutting board and place the flat of your knife on top of each clove. Carefully give the garlic a whack with the palm of your hand to separate the cloves from the skins. Throw out the skins and chop up the garlic. Remember to keep your fingers curled under and the edge of your sharp, chef's knife tilted slightly away from your body.
Add extra-virgin olive oil to the pan by pouring a slow stream of it twice-around-the-pan. This will be about 2 tablespoons of extra-virgin olive oil just enough to coat the bottom of the pan. Do not let the oil pour out too fast. You are looking for a slow, steady stream. Add the garlic to the oil. To chop the onion, cut the ends off and cut the whole onion down the center. Wrap half and save it. Cut the other half into thin slices then twist the slices a quarter turn and chop them again. Hold the tip of knife on the cutting board and lift the back of the knife up and down over the onion to make the pieces really small. Add the chopped up onion to the garlic and oil. Cook, stirring a lot, 5 minutes until the onions are mushy and look cooked.
Add the tomatoes to the onions and stir. When the tomatoes come to a bubble, reduce the heat under the sauce to low. Stir in basil pieces to wilt them. Season the sauce with salt and peppe, to your taste.
Preheat your broiler to high and place a rack in the center of the oven.
Drain pasta shells. Add them to a casserole dish. Add pesto sauce, 1 cup of ricotta cheese and a handful of grated Parmigiano, too. Stir carefully and coat the hot pasta with the pesto and cheeses. Pour the hot tomato and basil sauce over the pasta, as much as you like. You can always serve a little extra at the table, to pass around. Shred up some mozzarella cheese with a grater and scatter it over the pasta. Add a final sprinkle of Parmigiano to the mozzarella as well. Place the casserole under the broiler in the middle of oven, 10 to 12 inches from the heat. Let the cheese melt and bubble on top, 3 to 5 minutes.
(This recipe is from the food network and identical to my mom's recipe!) 
http://www.foodnetwork.com/recipes/rachael-ray/tomato-basil-and-cheese-baked-pasta-recipe/index.html
Thursday, November 1, 2012

Bacon, Egg, & Cheese Biscuit Cups

Has it become obvious that I like eggs? I really think I could eat them every morning. First, it was just scrambled eggs. Then I stepped out of the box a little when I discovered the glorious "omelet." Now, I've even grown to like them poached, boiled, and over-easy. The home-made egg mcmuffin was great for a while. Then came the eggs cups. Various omelets i've concocted. I just wanted to try something a little different, maybe a smidge more tasty (aka less healthy), but still within the realm of my healthy cooking pursuit.

I actually found this recipe on a weight watchers website. I don't know about you, but when I hear the terms weigh watchers and food in one sentence, nothing appealing comes to mind. I automatically think of bland, unsatisfying, not very filling food. But this was an exception. It had just the ingredient I'd been missing so much- biscuits! 

This recipe was great because you can make them in the morning, heat them up later or even the next day, and they are still good. I used turkey bacon instead of regular bacon to reduce the fat. BTW, if you haven't tried turkey bacon yet, you are severely missing out. I am obsessed with the lean meat and it is a perfect substitute for many recipes that call for bacon. But that's beside the point…

To make it even more healthy I used skim milk instead of whole milk, and reduced fat cheese. And remember, many of these ingredients can be substituted to adjust to your own liking. Many types of cheese would work fine, and the bacon can always be substituted for sausage (turkey sausage if it were me). Enjoy!


Ingredients:
4 slices center cut bacon (I used Oscar Meyer Center Cut)
3 large eggs
3 T skim milk
Salt & black pepper, to taste
1 can Refrigerated Biscuit Dough (10 biscuits, 7.5 oz - I used my store brand)
1/3 c reduced fat 2% shredded cheddar

1 sliced jalapeno placed on top 

Directions:
1.Preheat the oven to 400. Lightly mist a muffin tin with cooking spray
2.Place the raw bacon in a large skillet and cook for 7-9 minutes or until done. Remove from skillet and let dry on paper towels. Chop into small pieces and set aside.
3.In a medium bowl, combine the eggs, milk, salt and pepper and whisk together until thoroughly blended.
4.Using a rolling pin, roll each biscuit into a larger flat circle and place into a cup in the prepared muffin tin. Using your fingers, press the dough into the bottom of each cup and up the sides. Divide the cheese evenly between each cup and then split the egg mixture between each cup as well. Sprinkle the bacon pieces on top of each cup and put in the oven for 10-12 minutes until biscuits are golden brown and eggs are set. Top with jalapeno when out of oven. 


http://www.emilybites.com/2011/10/bacon-egg-cheese-biscuit-cups.html

Monday, October 29, 2012

Cottage Cheese Cantaloupe Salad

Don't let the name turn you away. It might not sound appetizing, but looks can be deceiving.This recipe was everything you could want in a perfect snack or appetizer: nutritious, cheap, easy, and yummy!

I have never been a fan of cottage cheese, mainly because I was too freaked out to try it. I grew up seeing my mom eat it by the spoonful and something about the look of it/ name of it/ texture really turned me off. As I matured into the grown up woman I am today (HA), I entertained the idea of trying cottage cheese and slowly grew to like it. I love to eat it with potato chips, mix it with a little jelly, or add fruit and make it sweet. 

The idea of fruit was what led me to this wonderful snack. Low-fat cottage cheese enhances the natural sweetness of cantaloupe and makes for a tasty treat yet still nutritious snack or appetizer.

I scooped out the middle of a half cantaloupe and put the cottage cheese inside, but you can always cut the cantaloupe into tiny pieces and mix it all together in a bowl. I figured my way looked a little more presentable if you wanted to put it out for guest. 

I added raisins and sliced almonds, but feel free to vary what's added. Granola 
would also be a very good choice.


(I varied a lot from the original website, but here is where the idea came from)

http://www.rd.com/food/cottage-cheese-cantaloupe-salad-recipe/


INGREDIENTS 


  • 2 cups (16 ounces) 1% cottage cheese
  • 1/2 cup raisins
  • 1/4 cup sliced almonds 
  • 1 medium cantaloupe, quartered and seeded
  • DIRECTIONS
  • In a bowl, combine the cottage cheese, raisins, and 
  • walnuts; mix well
  • Spoon into hollowed out cantaloupe. Enjoy! 


Thursday, October 25, 2012

Garlic Lemon Chicken

When it comes to time management and cooking chicken, I seem to be on a roll. Here is another recipe that took very little time to make, has few ingredients, and tastes like it was ordered at a fine dining restaurant. I seem to have a thing for garlic these days. I don't mean to, but I'm always drawn towards the recipes that call for his flavorful ingredient. 

Tonight I was home alone and working on a paper when my always frequent procrastination set in. I needed to take a break (10 minutes into the paper) and had the urge to cook. I'm telling you, I'm a new person. I'm going to be housewife of the year someday (completely kidding). 

I was shocked to have had all of these ingredients on hand and knew it was a sign that this chicken was made me for me to cook. I've been eating healthy all week and ok, I know frying chicken isn't the most nutritious way to cook it, but I needed a little diversion in my life. Hey, much better than fast food at least. It took me all of fifteen minutes to make and allowed me to get right back to staring at my computer screen…I mean writing my paper.

If you prefer not to fry the chicken, you can bake it on 375 for 30 to 40 minutes. Just make sure you marinade the chicken, instead of just pouring the ingredients on top so it can absorb the flavor. 


              (I scraped some of the bread crumbs off- it was a little much) 

4 boneless skinless chicken breast halves--> I only had 2 and it was just enough! 
4 teaspoons flour
salt and pepper
2 teaspoons oil
1/2 cup chicken broth
1 teaspoon minced garlic
2 teaspoons lemon juice
1 teaspoon butter--> I used margarine


Flatten chicken slightly. Dust with flour. Salt and pepper chicken.

Fry in hot oil 5 minutes each side. Remove chicken from pan.

To pan add broth, garlic, lemon juice and butter. Cook 2 minutes. Pour over chicken.

http://www.food.com/recipe/15-minute-garlic-lemon-chicken-20624


Monday, October 22, 2012

Cooking Basics

I came across these two cheat sheets one day in class. Aimlessly scrolling through Pinterest, I knew I spotted this measuring equivalent chart and veggie cooking cheat sheet and knew I would think myself later for re-pinning them. Just thought i'd share! I printed them both out and stuck them in a kitchen drawer. I cannot tell you how many time's i've used them, especially the equivalent sheet- because clearly, I have forgotten basic measuring, taught in fourth grade….


http://www.kidspot.com.au/meal-planning/Tools-Veggie-cooking-guide+6774+753+article.htm#.T063Jwtusb0.pinterest

http://pinterest.com/pin/94294185918710611/


Saturday, October 20, 2012

Oven-Roasted Eggplant

I never realized how unique certain foods are. Eggplant being one of them. The color is absolutely beautiful, the skin on the outside perfectly shiny and smooth. I guess I was feeling a little artistic today but I was really intrigued by this vegetable. I myself would never buy an eggplant. The thought would never even cross my mind when grocery shopping. But I was home for the weekend and my mom happened to have one in the fridge. I had never cooked eggplant before, have only tried it maybe once. It was an anomaly to me. How exactly could you cook this beautiful, purple, object and would it actually taste good? I took a shot at it. 

Since I've never cooked eggplant before, I chose a very simple recipe. I wanted conquer the basics rather than risk trying something too complicated and messing it up. I chose a basic oven-roasted recipe that seemed simple to make.

The most confusing part of the experience was the eggplant itself. The texture of the inside was just as surprising to me as the outside. I followed the recipe, cutting diamond like slivers in the skin and sprinkling salt into the cuts. After baking the eggplant, I was surprised to see how it looked when cooked. It shriveled up into a considerably smaller shape and the outside skin turned a funny brown color. 

I was a little unsure of what I was about to put in my mouth when I finally tried it. It was interesting to say the least. I had to get familiar with the taste but ended up liking it. I won't say that it is my favorite vegetable, but I would be willing to try different variations of the recipe sometime in the future. 


2 lb. eggplant (about 2 globe or 4 Italian) 
Kosher salt 
2 to 3 Tbs. extra-virgin olive oil 
8 fresh thyme sprigs ---> I didn't have these (therefore didn't use them)
Lemon wedges or a vinaigrette for serving (optional) 


Wipe the eggplant clean and slice them in half lengthwise. With the tip of a knife, score the flesh deeply in a diamond cross-hatch pattern by making two or three long cuts, cutting at a steep angle, and then rotating the eggplant to make another set of similar cuts. Press on the edges of the halves to open the cuts and sprinkle salt (1 to 1-1/2 tsp. total for all the halves) over the surface and into the cuts. Set aside, cut side up, for 30 min. Heat the oven to 400°F. Line a baking sheet with parchment.
Over the sink, gently squeeze the eggplant to extract the salty juice and wipe them dry with a paper towel. Brush each half thoroughly with olive oil (about 1 tsp. per half for Italian eggplant, 2 tsp. per half for globe). Arrange each half, cut side down, on top of a sprig or two of thyme on the baking sheet. Roast for 1 hour. Let cool considerably before handling, at least 20 min. Gently turn the cut side up. If serving as a side dish, serve with a lemon wedge for squeezing or drizzle with vinaigrette. 

http://www.finecooking.com/recipes/oven_roasted_eggplant.aspx?nterms=52350,53084